Since every reel of fiber cable we produce has a Web Trak identification number, we can run the fiber quality test report, or as some in the construction industry call it, the birth certificate, and see that the cable tested well and all the fibers were intact. The cable met all dimensional and mechanical specification tolerances as it left our factory.
So how did the cable end up damaged?
CLICK TO TWEET: CommScope gets a lot of questions in the field about fiber cables. Here are some of the most common questions and answers.
Early in my career, I was in contract cable construction, installing my first reel of fiber cable in 1988. While there was a lot of care taken during the installation, no one had provided us with best practices. The cable was installed without damage due to a great deal of luck. Realizing this, I have since devoted a significant part of my career to defining and teaching best practices for installing fiber optic cables.

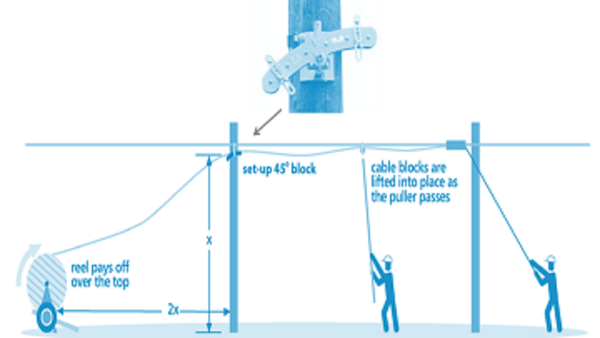
- Reel placed too close to the set-up pole: Ideally, the reel needs to be placed 1.5 – 2 times the height of set-up attachment. For example, an 18-foot attachment would require the reel to be 27 to 36 feet away.
- Improper set-up block: Always use a 45-degree roller block for this, not a single roller block or a set-up chute.
- Lack of appropriate break-away swivel: Always use a break-away swivel on the lead end of the cable. Check to make sure it has the correct shear pin rated for that cable’s maximum pulling tension.
- Use of single roller at tangential poles (30-degree line change or greater): Always use a 45- or 90-degree roller block based on the change of pole line angle.
- No one assisting the reel: The reel should always be attended, and the rotation of it assisted to reduce back tension.
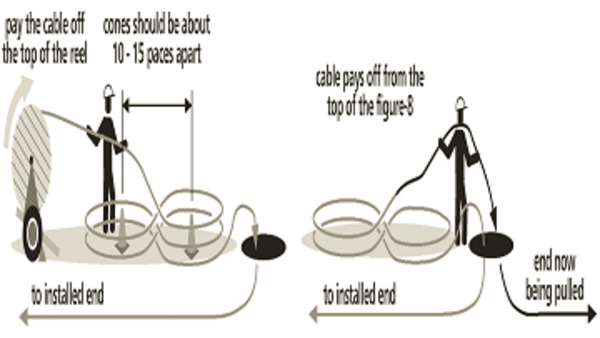
- Paying cable off from bottom of reel: The cable should always be paid off from the top of the reel.

- Improper set-up block: Always use a minimum of 45-degree roller block for this. In most instances, a 90-degree block is needed or even a series of angle blocks, not a single roller block or a set-up chute.
- Lack of appropriate break-away swivel: Always use a break-away swivel on the lead end of the cable. Check to make sure it has the correct shear pin rated for that cable’s maximum pulling tension.
- Incorrect application or no application of lubricant: A qualified cable-pulling lubricant should always be used.
- As noted above, the reel should always be attended, and the rotation of it assisted to reduce back tension.
- Paying cable off from bottom of reel: The cable should always be paid off from the top of the reel.
- Reel not positioned to face the opposite direction of the pull.
- Failure to proof the duct and clear it prior to beginning pull: While it takes some extra time, it is an important step in a successful installation.
- Exceeding fill ratio of a conduit: Always verify the fill ratio of a conduit. CommScope offers a free calculator for pulling cable into conduits called PullMaster.
At the end of the day, we’re always here to support you in your deployments. We’d also love to hear your success stories. That reminds me of a favorite saying: "Success is no accident. It is hard work, perseverance, learning, studying, sacrifice and most of all, love of what you are doing or learning to do.”


